Table of Contents
- Top Signs of Rodent Infestation in Walls You Should Never Ignore
- Noises in Walls at Night: What You Are Really Hearing
- How Rodents Get Into Walls and Where They Hide
- The Dangers of Rodents in Walls: Health and Structural Risks
- How to Get Rid of Mice in Walls: DIY vs. Professional Removal
- How to Seal Holes to Prevent Rodents From Returning
- When the Signs of Rodent Infestation in Walls Mean You Need a Pro
- Conclusion
Last Updated: May 27, 2026
Rodents are among the most destructive household pests in North America, and knowing the signs of rodent infestation in walls is the fastest way to stop a small problem before it becomes a structural nightmare. The team at Zoifia Pest Control has seen firsthand how homeowners in the Metro Boston area miss early warning signs for weeks, allowing colonies to grow inside wall voids before any action is taken. Below, this guide covers every diagnostic signal, acoustic clue, entry point, and removal strategy you need to protect your home in 2026. The part most guides skip entirely is post-removal sanitation, and that oversight can cost you a second infestation within months.
Top Signs of Rodent Infestation in Walls You Should Never Ignore
A rodent infestation in walls is defined as the presence of mice, rats, or similar wildlife living and breeding inside the structural cavities of a building, typically wall voids, floor joists, or ceiling spaces. Recognizing the physical evidence early is everything.
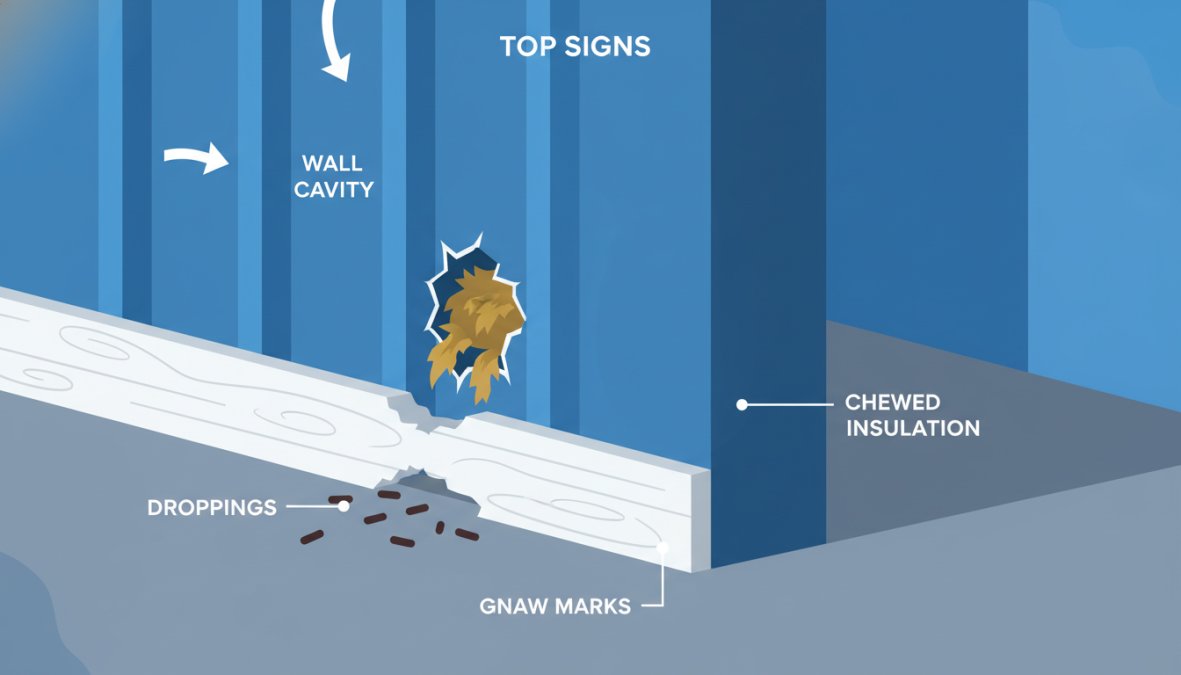
Here are the primary signs to look for, in order of reliability:
- Droppings near baseboards or inside cabinets – Mouse droppings are roughly the size of a grain of rice, dark brown, and pointed at both ends. Rat droppings are larger, about the size of a raisin, and blunt.
- Gnaw marks on wood, drywall, or electrical wires – Fresh gnaw marks appear lighter in color. Older marks darken with time.
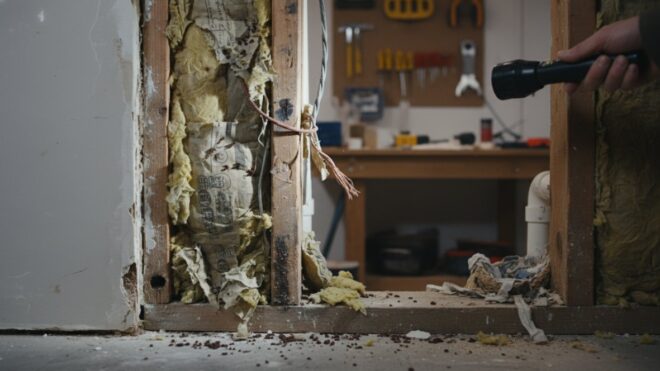
- Nesting material in hidden corners – Shredded insulation, fabric scraps, paper, and plant matter tucked behind appliances or inside wall cavities.
- Grease trails along baseboards – Rodents follow the same paths repeatedly, leaving oily smear marks from their fur.
- Urine odor – A persistent ammonia-like smell, especially in enclosed spaces like under sinks or inside wall cavities, signals active rodent activity.
- Scratching or scurrying sounds at night – Nocturnal activity is one of the most consistent early indicators.
- Visible entry points – Chewed gaps around pipes, vents, or utility lines entering the building.
Gnaw Marks and Structural Damage
The chewing behavior of rodents is not random. Rodents gnaw constantly because their incisors never stop growing, and they need to file them down. This means any material in their path is fair game: wooden studs, PVC pipes, drywall, and most critically, electrical wires.
A common mistake homeowners make is dismissing small gnaw marks as old damage. Fresh marks have a pale, almost splintered appearance. If you press your finger against the wood and it feels rough and exposed, the damage is recent.
Structural damage assessment requires more than a visual check. Run your hand along baseboards in rooms adjacent to the suspected infestation. Feel for soft spots in drywall, which can indicate moisture from rodent urine pooling inside the wall cavity. In serious infestations, the insulation inside walls becomes compressed and contaminated, reducing its thermal efficiency and requiring full replacement.
Rodents chewing through electrical wires inside wall voids are a documented cause of residential fires. If you find gnaw marks near electrical panels, junction boxes, or wiring runs, call a licensed electrician and a pest control professional before attempting any DIY removal.
Droppings, Urine Odor, and Nesting Material
Droppings are the most reliable physical evidence of rodent activity. Fresh droppings are soft and dark; older ones harden and turn gray. Finding droppings in multiple locations suggests an established colony rather than a single animal passing through.
Urine odor is harder to detect in open spaces but becomes unmistakable inside cabinets, behind appliances, and near wall voids. A UV flashlight is a practical tool here: rodent urine fluoresces under ultraviolet light, letting you map active travel routes along walls and floors.
Nesting material found inside walls typically includes shredded insulation, paper, fabric, and dried plant matter. Finding a nest confirms that breeding is occurring, which means the population is growing. According to CDC guidance on rodent control and disease prevention, a single female mouse can produce five to ten litters per year, with each litter containing five to six pups. Waiting is not a neutral decision.
Noises in Walls at Night: What You Are Really Hearing
Scratching sounds inside walls at night are not a coincidence. Rodents are primarily nocturnal, meaning their peak activity aligns with the quietest hours of your household. The sounds you hear are real diagnostic data, not imagination.
The most common noises associated with a rodent infestation in walls include:
- Scratching or scrabbling: Movement along wall studs or insulation, most audible in the 30 minutes after you turn the lights off.
- Gnawing sounds: A repetitive, rhythmic chewing noise, often mistaken for pipes settling.
- Squeaking: High-pitched vocalizations, typically from juveniles or during territorial disputes.
- Rustling: Movement through nesting material, often heard in ceiling voids above bedrooms.
Acoustic Identification: Mice vs. Rats vs. Other Wildlife
Acoustic identification is the process of distinguishing between pest species based on the sounds they produce inside wall voids. This matters because the removal strategy for mice differs significantly from the approach needed for rats or squirrels.
| Species | Sound Profile | Activity Timing | Wall Location |
|---|---|---|---|
| Mice | Light scratching, high-pitched squeaks | Late night, 1-4 AM | Lower walls, baseboards |
| Rats | Heavy thumping, low-pitched grinding | Dusk to midnight | Lower walls, floor voids |
| Squirrels | Rapid scurrying, rolling sounds | Dawn and dusk | Attic, upper walls |
| Bats | Soft chirping, fluttering | Dusk only | Attic, roof voids |
The real difference between mice and rats acoustically comes down to weight. Mice produce light, rapid scratching sounds. Rats are heavier and produce a more pronounced thumping or dragging sound when moving through wall cavities. Squirrels are faster and produce a distinctive rolling sound, often from nuts being moved.
Place your ear against the drywall in the area where you hear noise. The vibration transfer through the wall surface can help you pinpoint the exact stud bay where the animal is active, which is valuable information when placing traps or calling a professional.
How Rodents Get Into Walls and Where They Hide
Most homeowners assume rodents enter through obvious gaps. The reality is far more unsettling.
Common Entry Points and the Quarter-Inch Gap Rule
The quarter-inch gap rule is the single most important concept in rodent-proofing: a mouse can compress its body through any opening larger than a quarter inch (roughly the diameter of a pencil), and a rat can squeeze through a half-inch gap. This means standard construction tolerances are, in many cases, sufficient for entry.
Common entry points include:
- Gaps around utility pipes and conduit where they penetrate exterior walls
- Spaces between the foundation and the sill plate
- Cracks in the foundation, particularly in older homes
- Unscreened attic vents and soffit gaps
- Gaps around garage door frames
- Spaces around dryer vents and HVAC line sets
Once inside, rodents prefer wall voids adjacent to heat sources: near water heaters, furnaces, and kitchen appliances. The basement and attic are the two most common staging areas, with rodents using insulation as both nesting material and a travel corridor between floors.
According to University of California Agriculture and Natural Resources integrated pest management guide, rodents typically establish their nests within 30 feet of their food source. That means your kitchen walls are always the highest-risk zone.
The Dangers of Rodents in Walls: Health and Structural Risks
The risks associated with a rodent infestation in walls fall into two categories: biological hazards from contamination, and structural hazards from physical damage. Most guides cover the first category adequately. Almost none walk homeowners through how to actually assess the second, particularly electrical wire damage, which is the most dangerous and least visible consequence of rodents living inside your walls.
Health Risks: What the Pathogens Actually Do
Rodents are reservoir hosts for several pathogens that can affect humans without any direct contact with the animal.
- Hantavirus Pulmonary Syndrome (HPS): Transmitted through inhalation of aerosolized particles from rodent droppings, urine, or saliva. The critical detail most guides omit is that the virus becomes airborne during disturbance, sweeping, vacuuming without HEPA filtration, or even walking through a contaminated area can be sufficient. According to CDC hantavirus transmission and prevention information, HPS has a case fatality rate that makes it one of the more serious rodent-borne diseases in North America. Deer mice are the primary carrier in the United States.
- Leptospirosis: A bacterial infection spread through contact with water or soil contaminated by rodent urine. In a wall-infestation context, this becomes relevant when urine pools inside wall cavities and seeps into subfloor material or concrete in basements.
- Salmonellosis: Spread through contamination of food preparation surfaces by rodent droppings or urine. Rodents traveling along kitchen walls and behind appliances create a direct contamination pathway to countertops and food storage areas.
- Secondary pest introduction: Rodent nests inside walls harbor fleas, ticks, and mites. When the rodent population is removed or dies off, these parasites actively seek new hosts, including the human occupants of the home.
Structural Risk Assessment: How to Inspect for Electrical Wire Damage
This is the section most pest control guides skip entirely, and it is the most important one for homeowner safety. Rodents gnawing through electrical wiring inside wall voids is a documented cause of residential structure fires. The problem is that the damage is invisible until something goes wrong.
Here is a practical inspection protocol homeowners can perform before calling a professional:
Step 1: Check your circuit breaker panel for unexplained trips.
A circuit that trips repeatedly without an obvious cause, no new appliances, no overloaded outlets, can indicate a partial wire breach inside a wall. Rodents rarely sever a wire cleanly; they strip insulation in stages, which creates intermittent short-circuit conditions. Log which circuits are tripping and when.
Step 2: Look for scorch marks or discoloration around outlets and switch plates.
Remove the cover plate from any outlet or switch in a room adjacent to suspected rodent activity. Look at the wall cavity visible through the opening. Discoloration, a burning smell, or visible char on the wire insulation are immediate red flags. Do not restore power to that circuit until a licensed electrician has inspected it.
Step 3: Inspect accessible wiring runs in the basement and attic.
Wall voids connect to the basement below and the attic above. In both spaces, wiring runs are often visible and accessible. Use a flashlight to examine insulation on wires running along joists or through drilled holes in framing. Look for:
- Stripped or frayed insulation with visible copper conductor
- Gnaw marks on wire sheathing (the outer plastic jacket)
- Droppings concentrated near junction boxes, which are warm and attract rodents
- Nesting material packed around wiring, which is a fire hazard independent of wire damage
Step 4: Note the age and type of wiring in your home.
Homes built before the mid-1970s may contain aluminum wiring or older cloth-insulated wiring. Both are more vulnerable to rodent damage and more dangerous when compromised. If your home has either type and you have confirmed rodent activity, professional electrical inspection is not optional, it is urgent.
If you find any evidence of gnawed wiring, do not attempt to repair it yourself and do not simply re-insulate the wire with electrical tape. Damaged wire inside a wall void requires a licensed electrician to assess the full run, not just the visible damage point. A rodent may have compromised the same wire in multiple locations along its travel route.
Structural Damage Beyond Wiring
Electrical damage is the most urgent structural concern, but it is not the only one.
Urine-driven wood rot and mold: Rodent urine is high in urea and ammonia. When it pools inside a wall cavity, particularly in the lower sections of walls where it collects against the bottom plate, it saturates wood framing and promotes both rot and mold growth. The exterior symptom is often a soft spot in drywall or a musty odor that persists even after cleaning visible surfaces. Pressing firmly on drywall in affected areas and feeling for unusual give is a simple first check.
Insulation degradation: Fiberglass batt insulation that has been compressed by rodent nesting, saturated with urine, or shredded for nesting material loses a significant portion of its thermal resistance (R-value). This is not recoverable through cleaning. Contaminated insulation requires full removal and replacement, which also provides the opportunity to inspect the framing cavity directly.
Load-bearing member compromise: In severe, long-term infestations, typically measured in years rather than months, rodents can cause meaningful structural compromise to wooden studs and plates through sustained gnawing. This is rare in typical residential infestations but becomes a real concern in homes where an infestation has gone undetected for an extended period, particularly in older homes with softer wood framing.
The compounding factor across all of these risks is time. Every week an infestation continues, the contamination spreads deeper into the building’s structure, the electrical damage risk accumulates, and the remediation cost increases. The breeding cycle ensures the population is not static, it is growing.
How to Get Rid of Mice in Walls: DIY vs. Professional Removal
Knowing how to get rid of mice in walls starts with an honest assessment of the infestation’s scale, and a clear framework for deciding when DIY effort stops being cost-effective and starts making the problem worse. Most guides either push you toward professional services immediately or give you a trap-placement tutorial without telling you when to stop. This section gives you both.
DIY vs. Pro Cost-Benefit Analysis
The decision between DIY and professional removal is not primarily about cost. It is about whether the tools and access available to a homeowner are sufficient to actually solve the specific problem in front of them. Some infestations are genuinely DIY-appropriate. Others are not, and attempting DIY on the wrong infestation delays effective treatment while the population grows.
Use this decision framework before you buy a single trap:
DIY is appropriate when ALL of the following are true:
- Droppings are confined to a single room or area (not multiple rooms or floors)
- There is no evidence of nesting inside wall cavities (no shredded insulation, no nesting material found inside walls)
- The sounds you hear are light scratching consistent with mice, not the heavier thumping associated with rats
- You have not found gnaw marks on or near electrical wiring
- The infestation appears to be recent (fresh droppings, no established grease trails)
- You are not in a high-risk health category (immunocompromised individuals, pregnant women, and young children face elevated risk from pathogen exposure during DIY cleanup)
Escalate to professional removal when ANY of the following are true:
- Droppings appear in more than one room, or on more than one floor
- You have confirmed rat activity (larger droppings, heavier sounds, gnaw marks through thick materials like baseboards or door frames)
- Nesting material has been found inside wall cavities or insulation
- Scratching sounds continue for more than two weeks after you begin trapping
- You find gnaw marks on or near electrical wiring, junction boxes, or the area around your electrical panel
- Urine odor persists after surface cleaning, indicating contamination inside wall voids
- You have caught more than four mice in a single week with snap traps, this suggests a larger population than surface evidence indicated
- You have had a rodent problem in the same home within the past 12 months, suggesting an unresolved entry point
DIY trapping is appropriate for one or two mice caught in open areas with no evidence of wall nesting. Any evidence of nesting inside walls, multiple active areas, rat activity, or electrical wire damage warrants professional intervention. The cost of re-infestation almost always exceeds the cost of getting it right the first time.
How to Do DIY Removal Correctly
For infestations that meet the DIY criteria above, snap traps remain the most effective and most humane removal tool for mice. The placement is where most homeowners fail.
Correct snap trap placement:
- Position traps perpendicular to the wall with the trigger end touching the baseboard. Mice travel along walls and will run directly across the trigger.
- Place traps in pairs, 2 to 3 inches apart, facing in opposite directions. Mice sometimes jump over a single trap.
- Set traps in every location where you have found droppings, not just the most obvious one.
- Check and reset traps daily. A sprung trap that is not reset is a wasted opportunity and can make remaining mice trap-shy.
- Use peanut butter as bait, a small amount pressed into the trigger cup, not piled on top. Mice will lick bait off a trigger without springing it if the bait is not secured.
What DIY cannot address:
- You cannot place a trap inside a wall void without creating an access hole, and you cannot retrieve a dead rodent from inside a wall cavity without knowing exactly where it is. A dead rodent inside a wall produces a persistent ammonia-and-sulfur odor that can last several weeks and attracts secondary pests including flies and carpet beetles.
- DIY rodenticide (poison bait) creates a secondary dead-rodent-in-wall problem at scale. Rodents that consume bait typically die inside wall voids, not in the open. For wall infestations, poison bait without professional placement and monitoring creates more problems than it solves.
- Entry point identification and sealing requires a systematic whole-building inspection that is difficult to perform without training. Trapping without exclusion work is a temporary fix, you are removing animals while the door remains open.
What Professional Removal Actually Includes
Understanding what a professional rodent removal service provides helps homeowners evaluate whether the cost is justified for their specific situation.
A licensed pest management professional brings several capabilities that are not replicable with consumer tools:
- Comprehensive entry point inspection: A trained inspector examines the full building envelope, foundation, sill plate, utility penetrations, roof line, attic vents, not just the areas where activity is visible. This is the step that prevents re-infestation.
- Population size estimation: Professionals assess dropping density, gnaw mark patterns, grease trail intensity, and acoustic evidence to estimate whether you are dealing with a handful of animals or an established colony. This determines the scope of treatment.
- Wall void access and targeted bait placement: Professional-grade bait stations designed for wall void placement require equipment and licensing that are not available to consumers. This is the primary tool for addressing infestations that have moved fully inside wall cavities.
- Exclusion work performed in conjunction with active removal: Sealing entry points while animals are still present requires a sequenced approach, trapping and removal first, then exclusion, that professionals manage as a coordinated program rather than two separate projects.
- Documentation for insurance or real estate purposes: If the infestation has caused structural damage, a professional inspection report creates a documented record that may be relevant for homeowner’s insurance claims or property disclosure requirements.
The Re-Infestation Cost Trap
The most common financial mistake homeowners make with rodent infestations is treating removal and exclusion as separate decisions. Homeowners who complete DIY trapping without addressing entry points frequently deal with re-infestation within one to two seasons, sometimes sooner, because the pheromone trails left by the previous colony actively attract new animals to the same entry points.
The practical implication: if you choose DIY removal, the exclusion work described in the sealing section of this guide is not optional. It is the second half of the same project. Skipping it converts a one-time removal effort into a recurring annual problem.
For infestations that have reached the wall void stage with confirmed nesting, the most cost-effective path for most homeowners is professional removal combined with professional exclusion performed in the same service window. The upfront cost is higher than DIY materials, but it addresses the root cause rather than the symptom and eliminates the re-infestation cycle that makes repeated DIY attempts more expensive in aggregate.
How to Seal Holes to Prevent Rodents From Returning
Sealing entry points is the only permanent solution to a rodent infestation in walls. Trapping and removal without exclusion work is a temporary fix.
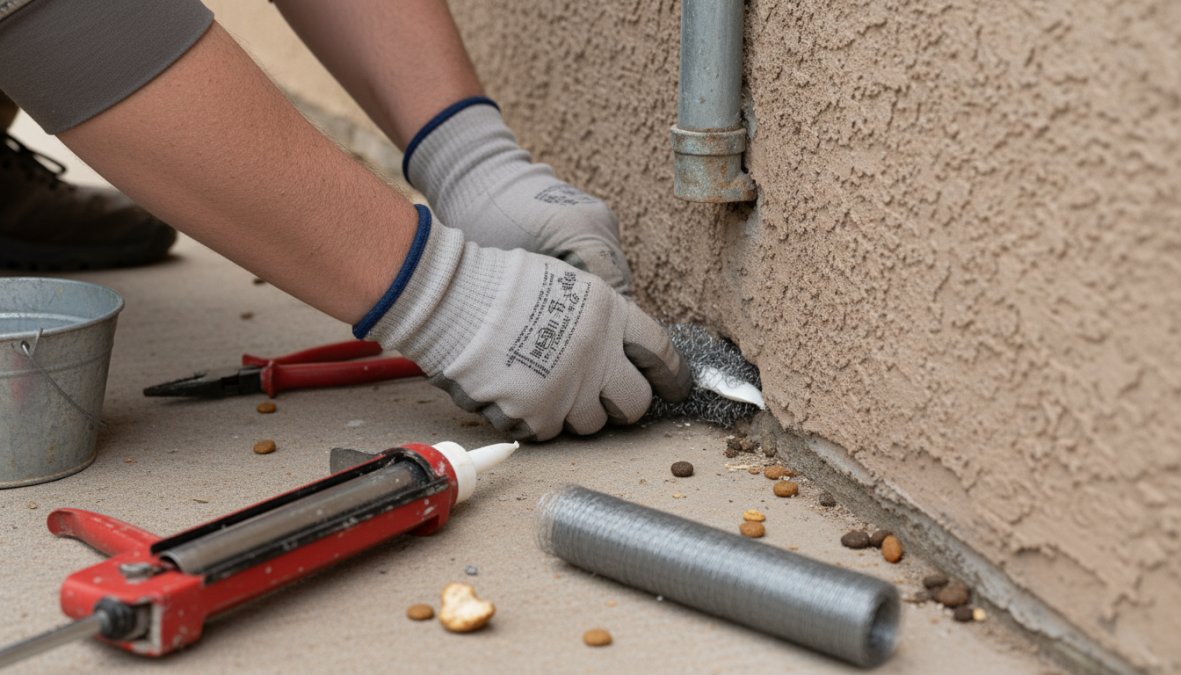
The materials matter. Rodents can chew through caulk, foam sealant, and wood. Effective exclusion requires materials they cannot gnaw through:
- Steel wool: Pack tightly into gaps before applying caulk over the top. Rodents cannot chew through steel wool.
- Hardware cloth (1/4-inch mesh): Use to cover larger openings such as attic vents, crawl space vents, and weep holes.
- Sheet metal flashing: Ideal for sealing gaps at the base of doors, around pipe penetrations, and along the foundation line.
- Concrete or mortar: The correct choice for cracks in foundation walls.
Work systematically from the foundation up. Start at the point where the foundation meets the sill plate, then move to utility penetrations, then to roof and attic vents. The EPA’s integrated pest management guidance for schools and commercial buildings recommends inspecting the entire building perimeter twice annually, in fall before rodents seek winter shelter and in spring to catch any new damage.
How to seal holes to prevent rodents from returning is not a one-time project. Seasonal inspections are part of a long-term rodent-proofing strategy, particularly in older homes where settling creates new gaps each year.
When the Signs of Rodent Infestation in Walls Mean You Need a Pro
Some situations are beyond the scope of DIY pest management. Recognizing them early prevents a manageable problem from becoming a serious one.
Call a licensed exterminator when you observe any of the following:
- Droppings in multiple rooms or on multiple floors, indicating an established colony
- Evidence of rats rather than mice (larger droppings, heavier sounds, gnaw marks through thick materials)
- Nesting material found inside wall cavities or insulation
- Urine odor that persists after cleaning, suggesting contamination inside wall voids
- Scratching sounds that continue after two weeks of DIY trapping
- Any gnaw marks on or near electrical wiring
- Signs of rodent activity in the attic or basement simultaneously, suggesting the infestation has spread through the building’s structural cavities
The signs of rodent infestation in walls that involve electrical wiring, extensive contamination, or rat activity are not situations where a slower response is acceptable. The structural and health consequences escalate quickly once a colony is established.
What most guides miss is that the timing of professional intervention matters as much as the decision to call. Rodent populations grow fastest in late summer through fall as animals seek winter shelter. Addressing an infestation in September is significantly easier than addressing the same infestation in February after a full breeding cycle has run its course.
Rodent infestations inside walls cause structural damage, create serious health hazards from pathogens like hantavirus, and grow faster than most homeowners expect. Zoifia Pest Control serves the Metro Boston area with licensed and insured rodent removal, exclusion, and pest management services backed by a 90-day guarantee and no long-term contracts required. If you are seeing the signs described in this guide, the right move is a professional inspection before the problem compounds. Get a quote from Zoifia Pest Control and stop the infestation before it takes over your walls.
Frequently Asked Questions
What do rodents in walls sound like?
Rodents in walls typically produce scratching, scurrying, or gnawing sounds. Mice tend to make light, rapid scratching noises, while rats produce heavier, slower thuds and dragging sounds. You may also hear squeaking or the rustling of nesting material. These noises are most noticeable at night during peak nocturnal activity, often coming from wall voids, the attic, or the basement. Hearing these sounds consistently is one of the clearest signs of a rodent infestation in walls.
How do I know if I have mice or rats in my walls?
Size clues help distinguish the two. Mouse droppings are small, about the size of a grain of rice, with pointed ends. Rat droppings are larger, roughly the size of a raisin, with blunt ends. Gnaw marks from rats tend to be rougher and larger. Sounds also differ, mice make lighter, faster scratching noises while rats produce heavier movement sounds. If you are hearing noises in walls at night and finding larger droppings, rats are the more likely culprit.
Are rodents in walls a health hazard?
Yes. Rodents in walls pose serious health risks. Their droppings, urine, and nesting material can carry pathogens including hantavirus, salmonella, and leptospirosis. These contaminants can become airborne during cleaning if proper precautions are not taken. Rodents also chew through electrical wires, creating fire hazards, and can damage insulation. Post-removal sanitation, disinfecting affected areas and safely disposing of nesting material, is a critical step that many homeowners overlook after addressing a rodent infestation.
Can I get rid of mice in walls myself, or do I need a professional?
Minor infestations with one or two mice can sometimes be managed with DIY traps and by sealing entry gaps. However, a full rodent infestation in wall voids is difficult to eliminate without professional pest management. Professionals can assess structural damage, locate hidden entry points, and use targeted rodenticide or humane removal methods safely. For recurring infestations or signs of rats, calling a licensed exterminator typically saves money long-term compared to repeated DIY attempts that do not address the root cause.
How do you seal holes to prevent rodents from coming back?
Start by inspecting your foundation, utility pipe entry points, and exterior walls for gaps as small as a quarter-inch, mice can squeeze through openings that size. Fill small cracks with caulk or expanding foam, and use steel wool or hardware cloth for larger gaps before sealing over them. Check door sweeps and weatherstripping as well. Rodent-proofing your home after removal is essential to prevent re-infestation, and it is one of the most cost-effective long-term pest control measures a homeowner can take.
At what time of day are rodents most active in walls?
Rodents are primarily nocturnal, meaning they are most active between dusk and dawn. If you are hearing scratching sounds or other noises in walls at night, especially in the hours just after you turn the lights off, that timing strongly suggests rodent activity. Hearing movement during daylight hours can indicate a larger infestation, as overcrowding in wall voids and nesting areas forces some rodents to forage outside their normal schedule. Daytime activity warrants prompt attention and possibly a call to a pest control professional.
This article was written using GrandRanker