
Table of Contents
- Signs of Mice in Walls and Around Your Home
- Where Mice Get In: Inside and Outside Your Home
- How to Seal Mouse Entry Points Step by Step
- Best Materials to Block Mouse Holes for Good
- Natural Mouse Repellents That Actually Work
- Pet and Child Safety When Stopping Mice from Entering Home
- Apartment and Rental Specifics: What Tenants Can Do
- Seasonal Maintenance Checklist and Professional vs. DIY Costs
- Conclusion
Last Updated: May 28, 2026
Mice can squeeze through a gap the size of a dime, which means knowing how to stop mice from entering home is less about luck and more about systematic exclusion. This guide from Zoifia Pest Control covers every angle: how to spot an infestation early, where entry points hide inside and outside your home, which materials actually hold up, and when to call a professional. Most guides stop at "seal your gaps." We go further.
Here is what most people get wrong: they react to mice after the fact instead of building a barrier before the first rodent scouts their property. Rodent control is a proactive discipline, not a cleanup task. The strategies below address both prevention and active infestation, so you are covered regardless of where you are in the problem.
Signs of Mice in Walls and Around Your Home
Catching an infestation early is the single biggest factor in how quickly you resolve it. Mice reproduce fast, and a small problem becomes a large one within weeks.
Droppings, Gnaw Marks, and Ammonia Smell
The clearest signs of mice in walls and around your home are droppings, gnaw marks, and a sharp ammonia smell from accumulated urine. Mouse droppings are small, dark, and rod-shaped, roughly the size of a grain of rice. Fresh droppings are moist and dark; older ones dry out and lighten in color. Finding fresh droppings tells you the infestation is active right now.
Gnaw marks appear on food packaging, wooden baseboards, electrical wiring, and pipe insulation. Mice gnaw constantly because their incisors never stop growing. Chewed wiring is not just a pest problem: it is a fire hazard, which is why according to the National Pest Management Association’s guidance on rodent risks, rodent-related electrical damage is a serious household safety concern.
The ammonia smell is harder to miss in enclosed spaces like cabinets, crawl spaces, and behind appliances. If you catch a sharp, urine-like odor in a room with no obvious source, run a thorough inspection before assuming it is something else.
Do not handle mouse droppings without gloves and a dust mask. Mice can carry hantavirus and salmonella, both of which spread through contact with contaminated droppings or nesting materials. Wet the area with a disinfectant before sweeping to avoid airborne particles.
Nesting Materials and Sounds Inside Walls
Mice build nests from shredded paper, fabric, insulation, and other soft materials. Finding small piles of these materials in corners, inside drawers, or behind appliances is a reliable infestation indicator. Nests are typically located close to food sources.
Sounds inside walls, particularly at night, are another strong signal. Scratching, scurrying, and squeaking between dusk and dawn point to active rodent movement. Mice are nocturnal, so daytime silence does not mean the space is clear.
Where Mice Get In: Inside and Outside Your Home
Mice do not appear randomly. They follow a path of least resistance, exploiting gaps that already exist in your home’s structure. Understanding entry points is the foundation of any effective exclusion strategy.
Inside Entry Points: Basement, Attic, and Crawl Space
Inside your home, the basement, attic, and crawl space are the three highest-risk zones for mouse entry. These areas share a common trait: they connect directly to the exterior through utility penetrations, structural gaps, and ventilation openings.
In basements, check where pipes and utility lines enter through the foundation wall. A gap of a quarter inch around a plumbing pipe is enough for a mouse to pass through. Attic spaces are vulnerable at the roofline, particularly where soffit meets fascia, and at any point where wiring or HVAC lines penetrate the ceiling. Crawl spaces present a broader challenge because they often have multiple unsealed vents and ground-level access points.
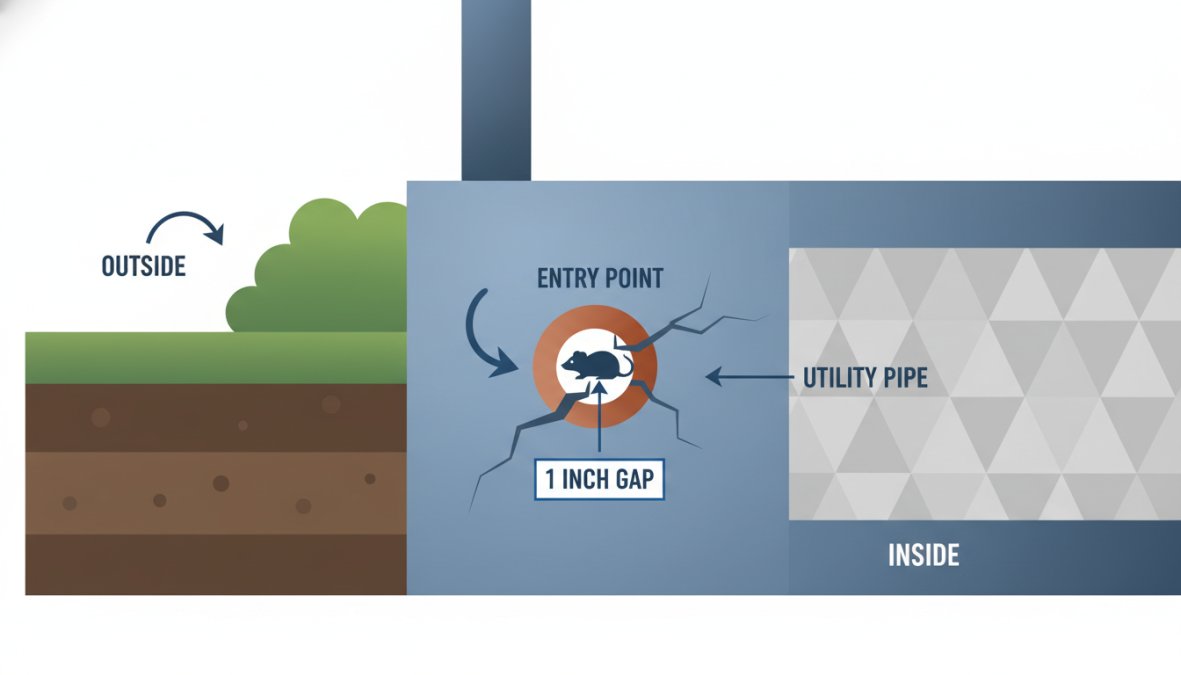
Outside Entry Points: Foundation, Utility Lines, and Vegetation
Outside the home, the foundation is the first place to inspect. Cracks in concrete or masonry, even hairline ones, widen over time and become usable entry points. Utility lines, including gas, electrical, and cable conduits, frequently pass through the foundation or exterior walls with inadequate sealing around the penetration.
Overhanging trees and dense vegetation create a direct pathway to upper-level entry points. Mice are capable climbers, and branches that touch the roofline function as a bridge. Vegetation management, specifically trimming branches at least six feet from the roofline and keeping shrubs pulled back from the foundation, reduces this risk significantly.
How to Seal Mouse Entry Points Step by Step
Sealing entry points is the most effective long-term method to stop mice from entering home. This process requires a methodical inspection before any materials go in.
Total Time: 3-6 hours for a standard single-family home
Difficulty: Moderate
What You’ll Need:
- Steel wool or copper mesh
- Caulk (silicone or polyurethane)
- Expanding foam (rodent-resistant formula)
- Hardware cloth (1/4-inch mesh)
- Door sweeps
- Vent screens
- Flashlight and inspection mirror
Step 1: Complete a full perimeter inspection. Walk the exterior of the home at foundation level, checking every point where a pipe, wire, or cable enters the structure. Mark gaps with tape or chalk.
Step 2: Move inside. Inspect the basement, crawl space, attic, and utility areas. Pay close attention to pipe penetrations under sinks and behind appliances.
Step 3: Fill small gaps (under 1/2 inch) with steel wool packed tightly, then seal over it with silicone caulk. Steel wool alone can be pulled out; caulk locks it in place.
Step 4: Fill medium gaps (1/2 inch to 2 inches) with hardware cloth cut to size, secured with screws or staples, then caulked around the edges.
Step 5: Seal large structural gaps with expanding foam rated for pest exclusion. Standard foam is too soft and mice can chew through it.
Step 6: Install door sweeps on all exterior doors. A gap at the base of a door is one of the most overlooked entry points in residential pest-proofing.
Step 7: Cover attic vents and crawl space vents with 1/4-inch hardware cloth or commercial vent screens designed for rodent exclusion.
Expected Result: After sealing, set snap traps or bait stations inside for two weeks to catch any mice already inside. If trap activity drops to zero, the exclusion is working.
Check the garage door seal while you are at it. The rubber sweep at the bottom of most garage doors degrades within a few years and leaves a gap wide enough for mice to enter. Replacement sweeps cost very little and are a common miss in DIY exclusion projects.
Best Materials to Block Mouse Holes for Good
The best materials to block mouse holes are steel wool, copper mesh, hardware cloth, silicone caulk, and rodent-resistant expanding foam. Each material has a specific use case, and using the wrong one is how exclusion attempts fail.
| Material | Best Use | Why It Works | Avoid Using For |
|---|---|---|---|
| Steel wool | Small pipe gaps | Mice cannot chew through it | Exposed exterior gaps (rusts) |
| Copper mesh | Weep holes, vents | Rust-resistant, flexible | Large structural gaps |
| Hardware cloth | Vent covers, crawl spaces | Rigid, durable, chew-proof | Tight pipe penetrations |
| Silicone caulk | Sealing over mesh/wool | Adhesive, weatherproof | Gaps over 1/2 inch alone |
| Rodent-resistant foam | Large interior gaps | Fills irregular shapes | Exterior-only applications |
| Weather stripping | Door and window frames | Closes dynamic gaps | Static structural gaps |
A common mistake is relying on standard expanding foam without reinforcement. Mice can chew through standard foam in under an hour. Always pair foam with hardware cloth or steel wool for any gap where rodent pressure is expected.

According to CDC guidance on rodent exclusion and pest-proofing, sealing entry points is the most reliable method for preventing rodent entry, more effective over time than trapping or baiting alone.
Natural Mouse Repellents That Actually Work
Natural mouse repellents are one of the most searched and most misunderstood topics in rodent control. The honest answer is that no repellent, natural or otherwise, replaces physical exclusion. But several options have legitimate supporting logic and real-world utility when used correctly. Here is a mechanism-level breakdown of what works, what does not, and why.
Peppermint Oil: What the Research Actually Shows
Peppermint oil is the most widely recommended natural repellent, and the mechanism is real: mice rely heavily on olfactory cues to navigate, and high concentrations of menthol interfere with their ability to detect food and pheromone trails. The problem is concentration and persistence. A few drops on a cotton ball produce a localized effect that dissipates within 24 to 48 hours in a ventilated space. For peppermint oil to function as a meaningful deterrent, you need a high-concentration product (look for 100% pure peppermint essential oil, not a diluted blend), applied in a confined, low-airflow space, refreshed every one to two days.
Where it has practical value: inside closed cabinets, inside the cavity behind a stove or refrigerator, and in enclosed storage areas where mice have been active but sealing is not yet complete. It is not a perimeter defense. Placing cotton balls near exterior gaps does nothing useful.
Safe for pets and children? Peppermint oil is generally low-risk for humans at the concentrations used in repellent applications. However, it is toxic to cats at higher concentrations, cats lack the liver enzyme needed to metabolize phenols, which are present in peppermint and most mint-family oils. Keep peppermint oil applications in areas cats cannot access, and never apply it directly to surfaces a cat will groom from.
Ammonia: Effective but Hazardous
Ammonia mimics the scent of predator urine, which triggers an avoidance response in mice. The mechanism is well-established in rodent behavior research, mice use chemosensory signals to assess predator presence, and ammonia activates the same olfactory receptors as actual predator urine. The practical limitation is that ammonia is a respiratory irritant for humans and pets at the concentrations needed to be effective, and it dissipates rapidly in any space with airflow.
If you use ammonia, place small open containers (a few tablespoons in a jar) in enclosed, unoccupied spaces: inside wall cavities you have access to, in crawl spaces, or in sealed storage areas. Do not use it in living areas, kitchens, or anywhere children or pets spend time. Ammonia and bleach should never be combined, the reaction produces chloramine gas, which is toxic.
The honest limitation: Ammonia works as a short-term deterrent in enclosed spaces. It does not prevent entry, and mice that are already established in a space will habituate to the smell within days.
Ultrasonic Repellent Devices: What the Evidence Shows
Ultrasonic devices are the most heavily marketed natural repellent category, and the evidence is the most mixed. The theory is sound: mice have a hearing range that extends well above human perception (up to roughly 90 kHz), and high-frequency sound in the 20-65 kHz range causes distress responses in rodents in controlled laboratory settings. The real-world problem is threefold.
First, ultrasonic sound does not penetrate solid objects. Furniture, walls, and appliances create acoustic shadows, meaning a device in one corner of a room may have no effect on mice traveling along the opposite wall. Second, mice habituate to persistent ultrasonic stimuli within days to weeks, the same habituation effect documented with other aversive stimuli in rodent behavior studies. Third, most consumer-grade devices operate at fixed frequencies, which accelerates habituation compared to variable-frequency models.
If you use ultrasonic devices, choose models with variable or sweeping frequency output, place them in open, unobstructed spaces, and rotate their position every week or two to reduce habituation. They are most useful in garages, attics, and basements where furniture obstruction is minimal.
Safe for pets? Standard ultrasonic devices marketed for rodent control operate in ranges that are also audible and potentially distressing to dogs, cats, rabbits, hamsters, and guinea pigs. If you have small pets, check the device’s frequency range against your pet’s hearing range before use. Devices marketed specifically as safe for dogs and cats typically operate above the canine and feline hearing threshold, verify this claim on the product specification sheet, not just the marketing copy.
Other Repellents Worth Knowing
Predator urine (fox or coyote urine): Available at garden and hunting supply stores. The mechanism is the same as ammonia, chemosensory predator detection, but the signal is more species-specific. Effectiveness is inconsistent in urban environments where mice have reduced exposure to natural predators and may have lower baseline fear responses to predator scent cues. More useful in rural or suburban settings.
Cloves and cayenne pepper: Both contain compounds (eugenol in cloves, capsaicin in cayenne) that irritate the mucous membranes of rodents. Useful as a contact deterrent on specific surfaces, sprinkled along baseboards or inside cabinet corners, but not as a space repellent. Requires frequent reapplication and is not effective as a primary strategy.
Bay leaves: Commonly cited in home remedy lists. The evidence is anecdotal. Bay leaves contain eucalyptol, which has mild repellent properties, but at the concentrations present in dried leaves the effect is negligible. Not worth relying on.
The Correct Role of Natural Repellents
Natural repellents are a supplementary layer, not a solution. Their correct use case is as a bridge measure: deployed in areas where exclusion work is in progress or incomplete, to reduce mouse activity in specific zones while you address the structural problem. A home that is properly sealed does not need repellents. A home that is not properly sealed will not be protected by repellents alone.
If you have children or pets, avoid ammonia-based repellents in living areas entirely. Stick to peppermint oil in inaccessible enclosed spaces, and verify ultrasonic device frequency ranges against your specific pets’ hearing before use. The safest repellent strategy for a household with children or pets is exclusion first, snap traps second, and repellents only as a targeted supplement in areas where non-target exposure is not possible.
If you want to test whether a repellent is actually working in a specific area, place a snap trap in the same zone alongside the repellent. If the trap catches mice, the repellent is not deterring them. This simple A/B approach gives you real feedback instead of guesswork.
Pet and Child Safety When Stopping Mice from Entering Home
This is the part most guides skip entirely, and it matters. Many conventional rodent control methods, particularly rodenticide bait stations, carry real risks for households with children and pets.
Snap traps are the safest mechanical option. They are inexpensive, effective, and pose minimal secondary poisoning risk. Place them in areas inaccessible to children and pets: inside cabinets, behind appliances, inside bait station enclosures, or along wall edges where mice travel.
Rodenticide baits should be used with extreme caution. Second-generation anticoagulant rodenticides (SGARs) are highly toxic to dogs, cats, and raptors that may consume a poisoned rodent. If you use bait stations, choose tamper-resistant enclosures specifically rated for households with pets and children, and place them in locations that are completely inaccessible to non-target animals.
Glue traps are not recommended in homes with pets. Cats and small dogs can become stuck, and the traps cause prolonged suffering in captured rodents, raising both safety and ethical concerns.
As documented in EPA guidance on rodenticide safety for pets and wildlife, households with pets should prioritize mechanical traps and exclusion over rodenticide products wherever possible.
The safest rodent control strategy for homes with children or pets is exclusion first, snap traps second, and rodenticides only as a last resort placed in tamper-resistant stations in inaccessible locations.
Apartment and Rental Specifics: What Tenants Can Do
Renters face a different set of constraints than homeowners. Structural repairs, large-scale exclusion work, and pest management are typically the landlord’s legal responsibility, but that does not mean tenants are powerless.
Know your rights. Most states require landlords to maintain habitable conditions, which includes addressing rodent infestations. If you report a mouse problem in writing and your landlord does not respond within a reasonable timeframe, you may have grounds for rent withholding or repair-and-deduct remedies depending on your state’s tenant protection laws. Check tenant rights resources from the U.S. Department of Housing and Urban Development for guidance specific to your state.
What tenants can do without landlord approval:
- Install door sweeps on interior unit doors (removable, no permanent modification)
- Place draft excluders at door bases
- Seal gaps under kitchen and bathroom sinks with removable caulk or foam
- Set snap traps inside the unit
- Remove food sources: store dry goods in airtight containers, eliminate standing water, take out trash regularly
Document everything. Photograph droppings, gnaw marks, and any visible entry points. Send written notice to your landlord with a specific deadline for response. If the problem persists, contact your local housing authority or board of health.
Sanitation is particularly important in multi-unit buildings. Mice travel between units through shared wall cavities and pipe chases. Even if your unit is clean, a neighbor’s infestation can migrate to yours. Coordinating with building management on a building-wide exclusion approach is far more effective than individual unit-level efforts.
Seasonal Maintenance Checklist and Professional vs. DIY Costs
Rodent pressure follows a predictable seasonal pattern, and most pest-proofing guides treat it as a one-time project. It is not. Mice respond to temperature, food availability, and structural changes in your home across the year. A seasonal maintenance approach keeps you ahead of each pressure window instead of reacting after mice have already moved in.
Why Seasonality Matters
Mice do not hibernate. In colder months, they actively seek warmth and move toward structures. In warmer months, outdoor food sources are abundant and mouse populations build up in fields, gardens, and landscaping adjacent to homes, populations that will push inward when temperatures drop in fall. Understanding this cycle tells you when to inspect, when to seal, and when to set monitoring traps.
Printable Seasonal Pest-Proofing Checklist
Use this checklist as a recurring maintenance schedule. The fall inspection is the highest-priority window. If you only do one round of pest-proofing per year, do it in September or early October before nighttime temperatures consistently drop below 50°F in your region.
🍂 FALL, Highest Priority Window (September-October)
This is when mice are most actively seeking entry. Complete this inspection before the first cold snap.
- Walk the full exterior perimeter at foundation level. Mark every gap, crack, or pipe penetration with chalk or tape before sealing anything.
- Inspect all utility entry points: gas lines, electrical conduit, cable/internet lines, HVAC refrigerant lines, and plumbing penetrations through the foundation or exterior walls.
- Check the garage door rubber sweep for cracks, compression loss, or gaps at the corners. Replace if there is any visible daylight under the door.
- Seal all identified gaps using the correct material for each gap size (see the sealing section above).
- Trim all tree branches to at least 6 feet from the roofline. Pull shrubs and dense plantings at least 12 inches from the foundation.
- Move firewood storage at least 20 feet from the home. Stacked wood is a primary harborage site for mice building up before winter entry.
- Set snap traps inside along wall edges in the basement, garage, and kitchen as a monitoring baseline. Check weekly.
- Inspect attic vent screens and crawl space vent covers. Replace any that are torn, corroded, or missing.
- Check door sweeps on all exterior doors. A worn sweep on a side door or back door is one of the most common missed entry points.
- Store birdseed, pet food, and grass seed in sealed metal or heavy-duty plastic containers. These are primary attractants that draw mice to garages and sheds.
❄️ WINTER, Monitoring and Maintenance (November-February)
Mice that entered in fall are now established. Focus on detection and containment.
- Check snap traps weekly. A trap that catches mice consistently for more than two weeks after sealing suggests an unsealed entry point is still active.
- Inspect utility areas in the basement after any significant temperature drop, freeze-thaw cycles can open new cracks in foundation concrete.
- Check the garage door seal again after the first hard freeze. Rubber compresses and loses its seal in extreme cold.
- Inspect under sinks and behind appliances for new droppings or gnaw marks. These indicate active movement inside the home.
- If you use a wood-burning fireplace, inspect the damper seal and the area where the chimney meets the roofline.
🌱 SPRING, Repair and Reset (March-April)
Winter frost damage opens new vulnerabilities. Inspect before the spring mouse population builds.
- Walk the full foundation perimeter again. Frost heave and freeze-thaw cycling can crack concrete that was intact in fall.
- Inspect crawl space vents and screens for winter damage.
- Check caulk around pipe penetrations. Silicone caulk can shrink and crack over winter in cold climates.
- Clear any vegetation that grew against the foundation over winter.
- Replace snap trap bait if traps have been set since fall (peanut butter dries out and loses effectiveness over several months).
- Inspect the attic for any evidence of winter activity: droppings, nesting material, or gnaw marks on insulation or wiring.
☀️ SUMMER, Prevention and Landscaping (May-August)
Outdoor mouse populations are building. Reduce harborage and access points before fall pressure begins.
- Trim overhanging branches and manage dense ground cover near the foundation.
- Inspect and repair any damaged window screens or vent screens.
- Check door sweeps for wear from spring and summer use.
- If you have a garden, manage compost properly, open compost piles are a significant mouse attractant adjacent to the home.
- Inspect the shed, detached garage, or outbuildings. These are staging areas where mice establish before moving to the main structure.
DIY Rodent Control vs. Hiring a Professional: A Real Cost-Benefit Framework
Most pest control guides either push DIY entirely or push professional services without giving you a framework to decide. Here is an honest breakdown.
What DIY Actually Costs
A complete DIY exclusion project for a standard single-family home typically requires the following materials:
| Item | Approximate Cost Range |
|---|---|
| Steel wool (large roll) | $8-$15 |
| Copper mesh (10-foot roll) | $15-$25 |
| Hardware cloth, 1/4-inch, 10 sq ft | $12-$20 |
| Silicone caulk (2-3 tubes) | $12-$20 |
| Rodent-resistant expanding foam (2 cans) | $20-$35 |
| Door sweeps (2-3 exterior doors) | $20-$45 |
| Snap traps (6-pack) | $8-$15 |
| Total material cost | $95-$175 |
Time investment for a thorough DIY exclusion on a standard home runs 4 to 8 hours for the inspection and sealing, plus ongoing monitoring time of 15 to 30 minutes per week for the first month. For a homeowner comfortable with basic tools and willing to do a methodical inspection, this is a reasonable investment.
Where DIY fails: The most common reason DIY exclusion does not resolve a mouse problem is incomplete inspection, not inadequate materials. Mice enter through points that are easy to miss: the gap behind a dryer vent flange, the space where a cable line enters through a finished wall, the compressed but not fully sealed corner of a crawl space door. Experience and inspection tools (borescope cameras, thermal imaging in professional settings) find these points faster and more reliably than a first-time inspection.
What Professional Pest Management Costs
Professional rodent exclusion and control pricing varies by region, home size, and infestation severity. General ranges based on industry-standard service structures:
| Service Type | Typical Cost Range |
|---|---|
| Initial inspection only | $75-$150 (often credited toward service) |
| One-time exclusion service (materials + labor) | $300-$600 for a standard home |
| Exclusion + active infestation treatment | $400-$900 depending on severity |
| Ongoing monitoring plan (quarterly) | $150-$300 per visit |
These are general ranges based on commonly reported industry pricing. Actual costs vary significantly by region, company, and home complexity. Always get at least two quotes before committing to a professional service, and ask specifically what the service includes: inspection only, exclusion materials, trapping, and any guarantee terms.
The Decision Framework: When to Stop DIY and Call a Professional
Use this framework to make the call objectively:
Stay with DIY if:
- You found droppings in one area only, and the infestation appears recent (fresh droppings, no nesting material found)
- Your home is relatively new construction with straightforward utility runs and accessible foundation
- You have completed a full perimeter inspection and identified specific, sealable entry points
- Trap activity drops to zero within two weeks of sealing
Call a professional if:
- You have found droppings in more than two rooms, or in the walls (scratching sounds in multiple areas)
- You have attempted DIY exclusion and trap activity has not decreased after three weeks
- Your home is older construction (pre-1980) with finished basements, complex utility runs, or a history of pest issues
- You have found evidence of nesting (shredded material, multiple droppings concentrated in one area), this indicates an established colony, not a scout
- You are a renter and the landlord has not responded to written notice within a reasonable timeframe, a professional inspection report strengthens your legal position
- You have found chewed wiring, this is a fire safety issue that warrants professional assessment regardless of infestation size
The cost of waiting: A mouse pair can produce 5 to 10 litters per year with 5 to 6 pups per litter under favorable conditions. An early-stage problem that a $150 DIY project resolves in October can become a multi-room infestation by January that requires professional exclusion and treatment. The cost of acting early is almost always lower than the cost of acting late.
DIY exclusion is genuinely effective for early-stage, straightforward situations. The decision point is not about capability, it is about whether your inspection is thorough enough to find every entry point. If trap activity persists after three weeks of sealing, assume you missed something and bring in a professional with the tools and experience to find it.
Zoifia Pest Control serves the Metro Boston area with licensed and insured rodent exclusion services, a 90-day guarantee, and no long-term contract requirement. If you have worked through the checklist above and the problem persists, get a quote and have a technician assess your specific situation before the next seasonal pressure window arrives.
Frequently Asked Questions
What is the best way to keep mice out of your house?
The most effective way to stop mice from entering your home is a combination of exclusion and sanitation. Seal every gap larger than a quarter-inch using steel wool, caulk, or metal flashing. Install door sweeps, repair damaged vent screens, and eliminate food and water sources. Consistent rodent control requires ongoing maintenance, checking entry points seasonally is key to keeping an infestation from starting in the first place.
Can mice chew through steel wool used to seal mouse entry points?
Mice can technically gnaw at steel wool, but they rarely do because the sharp fibers irritate their mouths. For best results when sealing mouse entry points, combine steel wool with a layer of caulk or expanding foam over the top. This locks the steel wool in place and removes the loose edges mice might pull at. Copper mesh is another durable exclusion material that resists gnawing better than standard steel wool alone.
What smells do mice hate, and are natural repellents effective?
Mice are sensitive to strong scents including peppermint oil, ammonia, and clove oil. While natural mouse repellents can discourage mice from settling in a treated area, they work best as a supplement to physical exclusion, not a replacement. Applying peppermint oil on cotton balls near known entry points may help deter scouts, but sealing gaps and removing food sources remains the foundation of any effective rodent control strategy.
What time of year do mice enter homes most often?
Mice most commonly enter homes in late fall, typically September through November, as outdoor temperatures drop and they seek warmth, shelter, and food. However, an infestation can begin any time of year if entry points exist. A seasonal maintenance checklist, inspecting your foundation, attic, crawl space, and pipe penetrations each spring and fall, is the most reliable way to stop mice from entering your home before they get a foothold.
Is it possible to completely mouse-proof a house?
Complete mouse-proofing is very difficult but highly achievable with diligence. Because mice can squeeze through gaps as small as a dime, thorough exclusion requires inspecting every utility line entry, vent, door gap, and foundation crack. Using quality exclusion materials like steel wool, caulk, and door sweeps, and maintaining them seasonally, gets you very close to a mouse-free home. For persistent infestations, a licensed pest management professional can identify gaps a homeowner might miss.
This article was written using GrandRanker