Table of Contents
- How to Identify a Mouse Problem in Your Apartment
- Landlord Responsibility for Mice: Know Your Tenant Rights
- How to Mouse Proof an Apartment: Sealing Entry Points
- Best Mouse Traps for Apartments: Snap, Glue, and Humane Options
- Sanitation and Food Storage: Cutting Off the Mouse’s Food Source
- How to Get Rid of Mice in an Apartment: DIY vs. Professional Pest Control
- How Long Does It Take to Get Rid of Mice in an Apartment?
- Conclusion
Last Updated: May 23, 2026
Mice are nocturnal, fast-reproducing, and exceptionally good at hiding. If you’re searching for how to get rid of mice in apartment, you’re likely already dealing with the unsettling reality of sharing your home with rodents. The team at Zoifia Pest Control has worked through hundreds of apartment infestations across the Metro Boston area, and the same patterns come up every time: renters wait too long, landlords deflect responsibility, and the wrong traps get placed in the wrong spots. This guide covers everything from identifying early warning signs to your legal rights as a tenant, so you can act fast and act smart.
Here’s what most guides get wrong: they treat apartment mouse problems the same as house mouse problems. They’re not. Apartments come with shared walls, communal utility lines, and a landlord dynamic that changes both your options and your obligations. Below, we’ll walk you through the exact steps to take, the materials that work without damaging your unit, and when to escalate to a professional.
How to Identify a Mouse Problem in Your Apartment
A mouse infestation is easier to confirm than most renters expect. Mice leave behind a consistent trail of evidence, and recognizing it early is the single most important factor in keeping a minor problem from becoming a serious rodent infestation.
Droppings, Scratching Sounds, and Other Warning Signs
Mouse droppings are the most reliable early indicator. They’re small, dark, and pellet-shaped, roughly the size of a grain of rice. You’ll typically find them along baseboards, inside cabinet drawers, behind appliances, and near any food source. Fresh droppings are soft and dark; older ones are dry and gray.
Scratching sounds at night are another clear signal. Mice are nocturnal, so the rustling, gnawing, or scurrying you hear inside walls or ceilings after dark is almost always rodent activity. A single mouse can sound surprisingly loud when it’s moving through a wall cavity.
Other warning signs include:
- Gnaw marks on food packaging, wood trim, or electrical wiring
- A musky, ammonia-like odor in enclosed spaces
- Grease smears along baseboards where mice repeatedly travel the same path
- Pets acting agitated near walls or under appliances
Do not handle mouse droppings with bare hands. Rodent droppings can carry hantavirus and salmonella. Always wear rubber gloves and use a disinfectant or bleach solution when cleaning contaminated surfaces.
Chewed Packaging, Nesting Materials, and Tracks
Chewed packaging in your pantry is a direct sign that mice have found a food source. They’ll chew through cardboard, thin plastic, and foil with ease. Check cereal boxes, pasta bags, and pet food containers first.
Nesting materials are another indicator that a mouse has moved in permanently rather than passing through. Mice build nests from shredded paper, fabric, insulation, and similar soft materials. Common nesting spots include the back of kitchen cabinets, behind refrigerators, inside wall voids, and under bathroom sinks.
Tracks are harder to spot on hard floors but visible in dusty areas. Mouse footprints are small, with four toes on the front feet and five on the back. If you suspect activity but can’t confirm it, place a thin layer of flour or talcum powder near suspected entry points overnight.
Landlord Responsibility for Mice: Know Your Tenant Rights
Landlord responsibility for mice is not optional in most U.S. jurisdictions. Pest control is generally considered part of the implied warranty of habitability, a legal doctrine that requires landlords to maintain rental units in a livable condition regardless of what the lease says. A rodent infestation typically qualifies as a habitability violation in every state that recognizes this doctrine, which includes all 50 states in some form, though the specific remedies available to tenants vary.
This section goes further than most guides. Rather than simply telling you that your landlord is responsible, it walks you through how to read your actual lease, what specific language matters, and what legal steps are available if your landlord refuses to act.
What Your Lease Clause May Say About Pest Control
Your lease is the first document to check, but most renters read it wrong. The goal is not just to find a section labeled "pest control." It is to understand how your lease interacts with your local housing code, because local law almost always overrides lease language that tries to shift habitability obligations onto the tenant.
How to read your lease for pest control obligations:
-
Search for the word "pest" or "infestation." Some leases have an explicit pest control clause. If yours does, read it carefully for two things: (a) whether it assigns responsibility to the landlord, the tenant, or both, and (b) whether it conditions the landlord’s obligation on the tenant having maintained "sanitary conditions." That second condition is the one landlords most commonly use to deflect responsibility.
-
Look for the implied warranty of habitability language. It may appear as "habitable condition," "premises in good repair," or a reference to compliance with local housing or health codes. If your lease references local code compliance, that reference imports your city or county’s pest control standards directly into your lease.
-
Find the notice and entry clause. This tells you how much advance notice your landlord must give before entering for treatment, and whether you are required to prepare the unit (e.g., empty cabinets, bag food). Knowing this prevents disputes about access.
-
Check for a "tenant-caused condition" carve-out. Many leases include language stating that the tenant is responsible for pest control if the infestation was caused by the tenant’s actions or negligence. This clause is frequently cited by landlords to avoid responsibility. However, in most jurisdictions, a landlord cannot use this clause to avoid addressing an infestation that originates in shared building infrastructure, walls, utility chases, or a neighboring unit, regardless of the tenant’s housekeeping habits.
What to do if your lease tries to make you responsible:
If your lease assigns pest control costs to you, do not assume that language is enforceable. Contact your local housing authority or a tenant advocacy organization and ask specifically whether your city or county housing code places pest control obligations on landlords. In many jurisdictions, including Massachusetts, New York, California, and Illinois, local code supersedes lease language that contradicts habitability standards. According to HUD’s guidance on tenant rights and habitability, when a lease provision conflicts with applicable law, the law governs.
If you are unsure whether your city has a housing code that covers pest control, search for “[your city name] housing code rodent” or “[your city name] sanitary code pest control.” Most municipal codes are published online. The relevant section is usually titled something like “Minimum Standards for Human Habitation” or “Sanitary Maintenance of Dwellings.”
How to Document and Report a Rodent Infestation
Documentation is your most important tool when dealing with a landlord who is slow to act. The goal is to create a paper trail that demonstrates (a) you notified the landlord in writing, (b) you gave a reasonable deadline, and (c) the landlord failed to respond adequately. This record is what a housing inspector, housing court judge, or small claims court will ask for.
Step-by-step documentation process:
-
Photograph everything before you clean it. Droppings, gnaw marks, nesting materials, and visible entry points should all be photographed with a timestamp. Most smartphone cameras embed the date and time in the image file automatically.
-
Write a formal notice via email. Email creates a timestamped record that is difficult to dispute. Your notice should include: the date you first observed the problem, a description of the evidence (droppings in X location, gnaw marks on Y), a reference to the specific lease clause or local housing code that places responsibility on the landlord, and a written deadline for response, typically 7 to 14 days is considered reasonable.
-
Reference the implied warranty of habitability explicitly. Use that phrase in your email. It signals to your landlord that you understand your legal rights and are not simply making an informal complaint.
-
Follow up in writing if there is no response. If your landlord does not respond within your stated deadline, send a second written notice stating that you have not received a response and that you intend to contact the local housing authority or health department if the issue is not addressed within a further specified period.
-
File a complaint with your local housing authority or health department. In most cities, a housing inspector can visit your unit, document the infestation, and issue a formal violation notice to your landlord. A violation notice creates legal pressure that an email from a tenant alone does not.
-
Understand your remedies if the landlord still does not act. Depending on your state, available remedies may include: rent withholding (depositing rent into an escrow account until the issue is resolved), repair-and-deduct (hiring a pest control professional yourself and deducting the cost from rent), or lease termination without penalty. These remedies have specific procedural requirements, you generally cannot simply stop paying rent without following the correct legal process. Consult your state’s tenant rights guide or a local tenant advocacy organization before exercising any of these options.
Do not withhold rent without first confirming the correct legal procedure for your state. Improper rent withholding can expose you to eviction proceedings even if your underlying habitability complaint is valid. Most states require you to provide written notice and allow a cure period before rent withholding is legally protected.
Key organizations for tenant legal support:
- Your local housing authority or code enforcement office (search "[city name] housing code enforcement")
- Your state attorney general’s consumer protection or tenant rights division
How to Mouse Proof an Apartment: Sealing Entry Points
How to mouse proof an apartment starts with one principle: mice can squeeze through any gap larger than a dime. Exclusion, the practice of physically blocking entry points, is the most effective long-term solution available to renters. Traps kill individual mice; exclusion stops more from entering.
Renter-Safe Exclusion Materials: Steel Wool, Copper Gauze, and Caulking
The right materials matter, especially in a rental where you cannot make permanent structural changes. Three options work well for apartment-specific DIY exclusion:
Steel wool is the most widely used gap filler. Mice cannot chew through it, and it compresses to fit irregular shapes. Press it firmly into gaps and crevices around pipes, behind appliances, and along baseboards. It is not a permanent fix on its own because it can rust and compress over time, but it works well as a short-term barrier.
Copper gauze is a superior alternative to steel wool for renters. It does not rust, holds its shape longer, and is equally resistant to gnawing. It is slightly more expensive but worth the investment for gaps you plan to leave in place for months.
Caulking compound seals gaps permanently and is appropriate for areas where mice are entering through cracks in walls or around window frames. Use a paintable caulk so you can restore the appearance of the wall when you move out. Caulk works best for narrow cracks; pair it with steel wool or copper gauze for larger openings.
Baseboards, Utility Lines, and Escutcheon Plates
Utility lines are the most overlooked entry point in apartments. Anywhere a pipe or wire passes through a wall creates a potential gap. Check under every sink, behind the washing machine connection, around the HVAC system, and where electrical conduit enters the wall.
Escutcheon plates are the decorative covers that sit around pipe penetrations at the wall. Many apartments have escutcheon plates that are loose or missing entirely, leaving a visible gap around the pipe. Tightening or replacing these plates eliminates one of the most common mouse entry routes in apartments.
Along baseboards, look for gaps where the baseboard meets the floor or wall. These are common in older buildings where the structure has settled. Copper gauze pressed into these gaps and secured with caulk is an effective, renter-safe solution.
According to the CDC’s guidance on rodent exclusion and prevention, sealing entry points is a critical component of any rodent control strategy and should be completed before or alongside trapping.
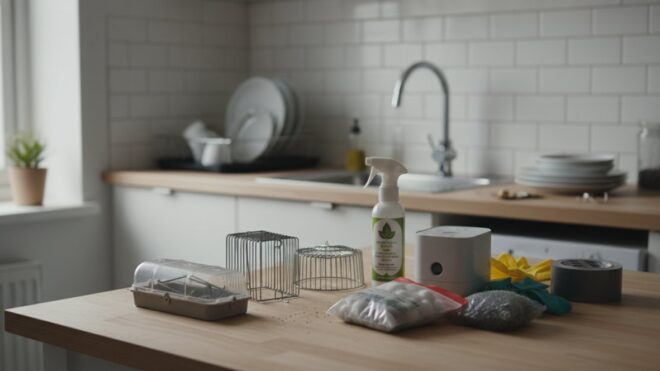
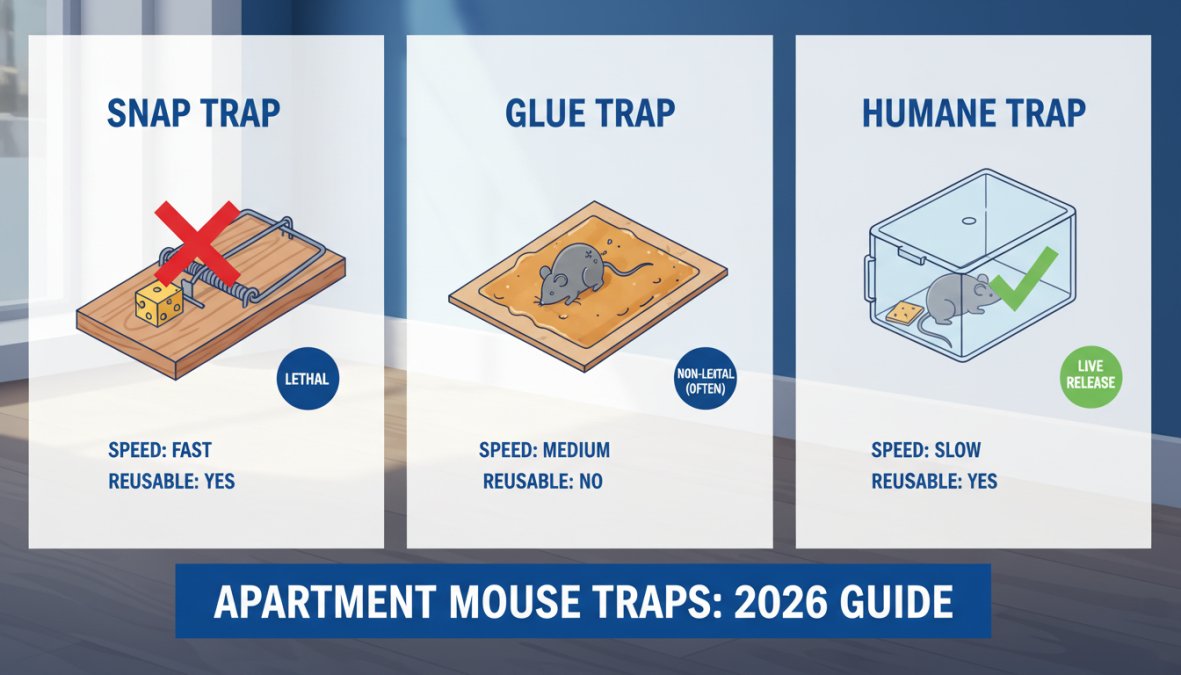
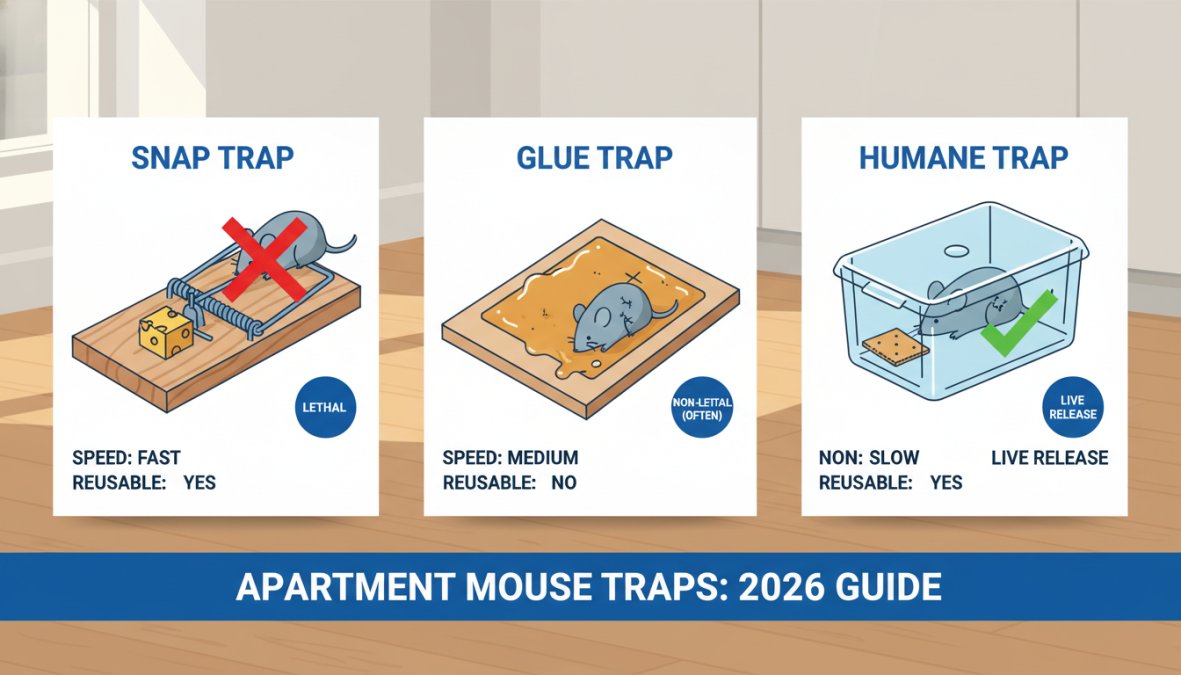
Best Mouse Traps for Apartments: Snap, Glue, and Humane Options
The best mouse traps for apartments depend on your specific situation: the severity of the infestation, whether you have pets or children, and your tolerance for handling dead rodents. Each trap type has genuine trade-offs.
Snap traps are the most effective and fastest-acting option. They kill instantly, they’re inexpensive, and they can be placed along walls and baseboards where mice travel. The downside is that you need to check and reset them regularly.
Glue boards catch mice but do not kill them quickly, which raises animal welfare concerns. They are also dangerous to pets and non-target wildlife. Many pest control professionals recommend against them in residential settings unless snap traps are not viable.
Humane catch-and-release traps are a reasonable option if you’re dealing with a single mouse or if you want to confirm mouse activity without killing. The significant drawback: you need to release the mouse far from the building, typically at least a mile away, or it will return. In an urban apartment setting, this is harder to manage than it sounds.
| Trap Type | Effectiveness | Pet/Child Risk | Cost | Best For |
|---|---|---|---|---|
| Snap trap | High | Moderate | Low | Active infestations |
| Glue board | Moderate | High | Low | Monitoring only |
| Humane trap | Moderate | Low | Moderate | Single mouse, no pets |
| Electronic trap | High | Low | High | Pet households |
Pet and Child Safety When Using Traps
This is the part most guides skip entirely. Standard snap traps and glue boards pose a real risk to curious pets and small children. A snap trap placed under a cabinet can injure a cat’s paw or a toddler’s finger.
Practical safety measures:
- Place snap traps inside a covered bait station or a cardboard box with a mouse-sized entry hole cut in the side. The mouse gets in; a pet’s paw does not.
- Never place glue boards in areas accessible to pets. A cat or dog that steps on a glue board will panic and injure itself trying to pull free.
- For households with children under five, electronic traps with enclosed killing chambers are the safest option. The mouse enters, the trap activates, and the child cannot access the mechanism.
- Keep all rodenticides completely out of apartments with pets or children. Rodenticide poisoning in pets is a serious veterinary emergency, and secondary poisoning can occur when a pet eats a poisoned mouse.
Rodenticides are not recommended for apartment use under any circumstances. Mice can die inside walls after consuming bait, creating odor problems that are difficult to remediate. In multi-unit buildings, rodenticides can also affect neighboring units.
Sanitation and Food Storage: Cutting Off the Mouse’s Food Source
Sanitation is not glamorous advice, but it is foundational. Mice enter apartments because they offer food, water, and shelter. Remove the food source and you make your apartment dramatically less attractive to rodents.
Practical sanitation steps that actually make a difference:
- Store all dry goods, including pet food, in hard-sided containers with tight-fitting lids. Cardboard and thin plastic are not barriers.
- Clean behind and under appliances regularly. Grease buildup under a stove is a reliable food source for mice.
- Empty kitchen trash cans daily or use a can with a secure lid.
- Fix any leaking pipes or faucets. Mice need water, and a dripping pipe under the sink is a reliable water source.
- Do not leave pet food in bowls overnight. Pick up uneaten food before bed.
- Declutter storage areas. Cardboard boxes and piles of fabric create nesting opportunities.
The connection between sanitation and infestation severity is direct. A mouse that finds no food source will move on faster. One that finds reliable food will establish a nest and breed. According to the EPA’s integrated pest management guidelines for rodents, sanitation combined with exclusion is more effective than trapping alone for long-term rodent control.
How to Get Rid of Mice in an Apartment: DIY vs. Professional Pest Control
The honest answer on how to get rid of mice in apartment on your own: DIY works for early-stage problems with one or two mice. It stops working when the infestation is established, when entry points are inside shared walls you cannot access, or when the problem is building-wide.
Signs that DIY is not enough:
- You’re catching mice consistently for more than two weeks with no reduction
- You’re finding new droppings in areas you’ve already cleaned and sealed
- You can hear activity in multiple rooms or inside wall cavities
- Neighbors in adjacent units are reporting the same problem
A pest control professional brings tools and access that renters cannot replicate. Professionals can inspect inside wall voids, identify building-wide entry points, and apply treatments in areas that are off-limits to tenants. They also carry liability for the treatment, which matters if the infestation recurs.
Zoifia Pest Control handles rodent infestations across the Metro Boston area with licensed, insured service and a 90-day guarantee. There are no long-term contracts, which matters in a rental situation where you may need one-time treatment rather than an ongoing plan. If you’ve exhausted DIY options or the infestation is clearly building-wide, getting a professional assessment is the faster path to resolution.
The cost comparison is also worth considering honestly. A few snap traps and a tube of caulk costs under twenty dollars. Professional treatment costs more upfront, but a recurring infestation that lasts months costs far more in time, stress, and potential property damage.
How Long Does It Take to Get Rid of Mice in an Apartment?
How long it takes to get rid of mice in an apartment depends on the size of the infestation and whether entry points are sealed. For a minor problem caught early, consistent trapping combined with exclusion typically resolves the issue within one to three weeks. Established infestations with active nesting can take four to six weeks of sustained effort.
The timeline extends significantly if entry points remain open. You can trap every mouse in your unit and have new ones entering through the same gaps within days. Exclusion and trapping must happen simultaneously for either to be effective.
Professional treatment typically accelerates the timeline. A licensed pest control professional can address the problem more comprehensively in a single visit, with follow-up treatment if needed within the guarantee period.
The Psychological Impact of a Mouse Infestation and How to Cope
This section belongs in every guide on this topic, and almost none of them include it.
Living with a rodent infestation is genuinely stressful. The sounds at night disrupt sleep. The sight of droppings in a kitchen creates anxiety around food safety. Many renters describe feeling like their home is no longer safe or clean, regardless of how thorough their cleaning efforts are. This is a normal response to an abnormal situation, not an overreaction.
A few things that help:
- Take action immediately rather than waiting to see if the problem resolves itself. Agency reduces anxiety. The moment you set traps and seal gaps, you’re doing something, and that matters psychologically.
- Separate the infestation from your self-worth as a tenant. Mice enter clean apartments as readily as dirty ones. An infestation reflects building conditions, not your habits.
- Communicate with your landlord in writing, even if the response is frustrating. Having a documented record of your efforts provides a sense of control.
- If the infestation is severe and your landlord is unresponsive, contact your local housing authority. You have legal recourse, and using it is appropriate.
For renters in the Metro Boston area, the Massachusetts Attorney General’s guide to tenant rights outlines your legal options when a landlord fails to address habitability issues including pest infestations.
The stress of dealing with mice in an apartment is real, but it is a solvable problem. Most infestations, addressed with the right combination of exclusion, trapping, and sanitation, resolve within a few weeks. The ones that don’t typically require professional intervention, not more patience.
Frequently Asked Questions
Is it the landlord's responsibility to get rid of mice in an apartment?
In most states, landlords are legally required to maintain habitable conditions, which includes addressing a rodent infestation. If mice were present before you moved in or entered through structural gaps, the landlord is typically responsible. Review your lease clause for pest control language, document the problem in writing, and submit a formal written request. If the landlord fails to act, you may have grounds to withhold rent or break your lease depending on local tenant rights laws.
What is the fastest way to get rid of mice in an apartment?
The fastest approach to get rid of mice in an apartment combines snap traps placed along baseboards and active runways with immediate sanitation, removing any food source and sealing gaps with steel wool or copper gauze. Set multiple traps the same night you spot signs of activity. For a severe rodent infestation, calling a pest control professional typically produces faster, more reliable results than DIY methods alone, often clearing the problem within one to two weeks.
Can I break my lease if there are mice in my apartment?
Possibly, yes. Many states allow tenants to break a lease without penalty if a landlord fails to address a rodent infestation that violates habitability standards. You generally must provide written notice and allow a reasonable repair window first. Check your specific lease clause and local tenant rights statutes before taking action. Documenting mouse droppings, chewed packaging, and all communications with your property manager strengthens your legal position significantly.
How do mice get into apartments on high floors?
Mice are skilled climbers and can travel through wall voids, utility lines, pipe chases, and elevator shafts to reach upper-floor apartments. They commonly enter through gaps around escutcheon plates, unsealed utility penetrations, and gaps and crevices along baseboards. Even a gap the size of a dime is large enough for a mouse to squeeze through. Sealing these entry points with steel wool, copper gauze, and caulking compound is the most effective long-term exclusion strategy regardless of floor level.
Are mouse traps safe to use around pets and children?
Standard snap traps and rodenticides pose real risks to curious pets and young children. To minimize danger, place snap traps inside enclosed bait stations that only a mouse can access, or position them behind appliances and inside cabinets out of reach. Avoid rodenticides entirely in homes with pets or small children, a humane catch-and-release trap or enclosed snap station is a safer alternative. Always check trap placement daily and dispose of catches promptly using rubber gloves and a disinfectant or bleach solution.
How long does it take to get rid of mice in an apartment?
A minor mouse problem caught early can often be resolved in one to two weeks with consistent trapping and exclusion. A more established rodent infestation may take three to four weeks or longer, especially if entry points remain unsealed. Professional pest control typically accelerates the timeline. Complete resolution requires eliminating the food source, sealing all entry points, and continuing to monitor with traps even after activity appears to stop, mice are nocturnal and signs of activity may not be immediately obvious.
Dealing with a mouse infestation in your apartment is stressful, time-sensitive, and often complicated by landlord dynamics that DIY guides don’t address. Zoifia Pest Control provides licensed, insured rodent removal services across the Metro Boston area, backed by a 90-day guarantee and no long-term contracts required. Get a quote from Zoifia Pest Control and resolve your rodent problem with a team that stands behind their work.
This article was written using GrandRanker